
Frustrated with flimsy plastic bags? Want a reusable, stylish way to carry your groceries, books, or everyday essentials? Learning how to sew a tote bag is a fantastic first sewing project, and this guide will walk you through every step, from cutting the fabric to adding the handles. We’ll start with a super simple method for instant gratification!
This comprehensive guide will take you beyond the basics. We’ll cover fabric choices, essential tools, a detailed step-by-step sewing process, and even ideas for customizing your tote bag to make it truly your own. By the end of this article, you’ll have the skills and confidence to create beautiful, durable tote bags for yourself and as gifts.
What You’ll Need for Sewing a Tote Bag
| Item | Quantity | Specifications |
|---|---|---|
| Fabric | 1 Yard | Cotton, Canvas, Denim (Medium Weight) – 44/45″ Wide |
| Scissors or Rotary Cutter | 1 | Fabric scissors or rotary cutter with mat |
| Ruler or Measuring Tape | 1 | 6-inch ruler or flexible measuring tape |
| Straight Pins | 1 Box | For securing fabric pieces |
| Sewing Machine | 1 | Basic sewing machine with straight stitch |
| Thread | 1 Spool | Matching the fabric color |
| Iron & Ironing Board | 1 | For pressing seams |
| Seam Ripper | 1 | For correcting mistakes |
| Marking Tool | 1 | Fabric chalk or disappearing ink pen |
Preparing Your Fabric and Pattern
Choosing Your Fabric
Cotton is the easiest fabric to work with for beginners. Canvas and denim are more durable options for heavier items, but may require a stronger needle on your sewing machine. Avoid slippery or stretchy fabrics like silk or knit for your first tote bag.
Cutting Your Fabric Pieces
You’ll need two rectangles for the body of the bag and two strips for the handles.
- Bag Body: Cut two rectangles measuring 16 inches wide and 18 inches tall.
- Handles: Cut two strips measuring 4 inches wide and 24 inches long.
Marking and Preparation
Iron your fabric to remove any wrinkles. This will ensure accurate cutting and sewing. Using your marking tool, lightly mark a ½ inch seam allowance around all edges of the bag body and handle pieces.
Step-by-Step Sewing Process
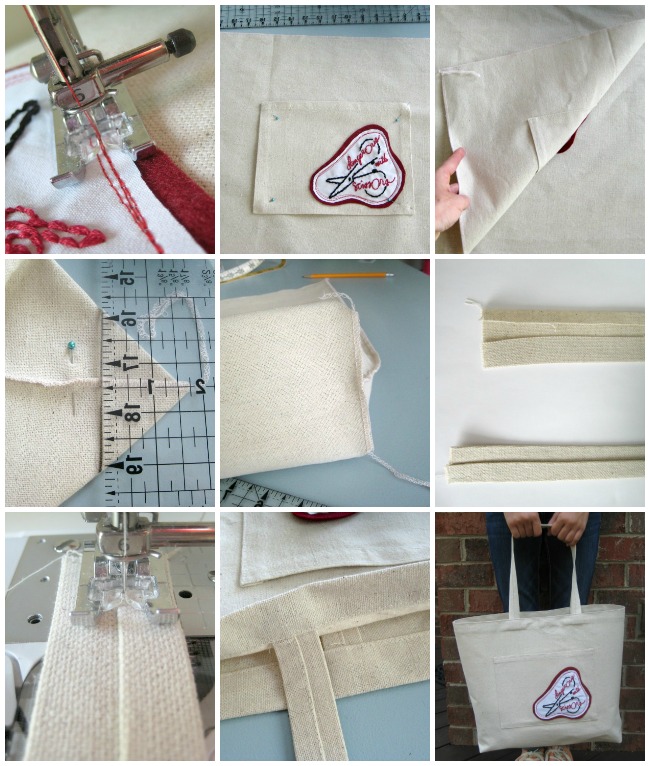
Phase 1: Constructing the Bag Body
- Pinning: Place the two bag body rectangles right sides together (the sides you want to be on the outside of the finished bag should be facing each other). Pin along both sides and the bottom edge, leaving the top edge open.
- Sewing: Using a ½ inch seam allowance, sew along the pinned sides and bottom edge. Backstitch at the beginning and end of each seam to secure the stitches.
- Finishing the Seams: Trim the seam allowances to ¼ inch. You can use pinking shears to prevent fraying, or serge the edges if you have a serger.
Phase 2: Creating the Handles
- Folding and Pressing: Fold each handle strip in half lengthwise, wrong sides together, and press.
- Folding Again: Open the folded strip, and fold each long edge towards the center crease, pressing again.
- Final Fold and Press: Fold the strip in half again, enclosing the raw edges, and press firmly. You should now have a long, narrow strip.
- Sewing the Handles: Topstitch along both long edges of each handle, close to the edge, to secure the folds.
Phase 3: Attaching the Handles
- Positioning the Handles: Turn the bag body right side out. On the outside of the bag, measure 4 inches in from each side seam along the top edge. This is where the handles will be attached.
- Pinning the Handles: Pin the ends of the handles securely to the bag, ensuring they are facing inwards.
- Sewing the Handles: Sew the handles to the bag with a square or a rectangular pattern, reinforcing the attachment point. Sew multiple passes for extra durability.
Phase 4: Finishing the Bag
- Folding the Top Edge: Fold the top edge of the bag down ½ inch towards the inside of the bag, and press.
- Folding Again: Fold the top edge down another 1 inch towards the inside of the bag, and press again. This creates a finished hem.
- Pinning and Sewing: Pin the folded hem in place. Topstitch around the entire top edge of the bag, close to the bottom of the folded hem.
Pro Tips for Tote Bag Success

- Pre-wash your fabric: This prevents shrinkage after the bag is sewn.
- Use a walking foot: If you’re sewing with thicker fabrics like canvas or denim, a walking foot will help feed the fabric evenly.
- Reinforce handle attachment: Handles bear a lot of weight, so ensure they are securely attached with multiple rows of stitching.
- Customize with pockets: Add interior or exterior pockets for extra organization.
- Experiment with different fabrics: Once you’re comfortable with the basic construction, try using different fabrics and patterns.
- Use clips instead of pins: Fabric clips can be a great alternative for thicker fabrics, as they don’t leave holes.
- Press as you go: Pressing after each step will give your tote bag a professional finish.
When to Call in a Professional
If you’re struggling with a particular step, or if your sewing machine is malfunctioning, don’t hesitate to seek help from a local seamstress or sewing machine repair shop. Signs you might need professional help include:
- Consistent skipped stitches
- Difficulty threading the machine
- Broken needles frequently
- Inability to sew through thicker fabrics
Typical costs for minor sewing repairs range from $10-$30, depending on the complexity of the issue.
FAQ
Q: What size should I make my tote bag?
A: The dimensions provided (16″ x 18″) are a good starting point, but you can adjust them to suit your needs. A wider bag is better for groceries, while a taller bag is good for books.
Q: Can I use a zigzag stitch instead of a straight stitch?
A: While a straight stitch is recommended for beginners, a zigzag stitch can be used for extra durability, especially when attaching the handles.
Q: What type of needle should I use?
A: A universal needle size 80/12 is suitable for most cotton fabrics. For thicker fabrics like denim or canvas, use a needle size 90/14 or 100/16.
Q: How do I prevent my bag from stretching out of shape?
A: Using a heavier weight fabric and reinforcing the handles with multiple rows of stitching will help prevent stretching. You can also add interfacing to the bag body for extra stability.
Alternative Solutions
If you find sewing a tote bag too challenging, consider purchasing a pre-made tote bag and customizing it with fabric paint, embroidery, or iron-on patches. Alternatively, you can repurpose an old t-shirt into a no-sew tote bag using simple knotting techniques.
| Solution | Pros | Cons | Best For |
|---|---|---|---|
| Pre-made Tote | Quick, easy, affordable | Limited customization | Immediate use |
| No-Sew T-shirt Tote | Eco-friendly, no sewing required | Less durable, limited design options | Beginners, repurposing |
Enjoy Your New Tote Bag!
Congratulations! You’ve successfully sewn your own tote bag.
Here’s what you’ve accomplished:
- Learned basic sewing skills
- Created a reusable and stylish accessory
- Reduced your reliance on plastic bags
Now you can proudly carry your belongings in a bag you made yourself.
Share a picture of your finished tote bag in the comments below! We’d love to see your creations and hear about your experience.


