
Traveling can be stressful, but having a well-made, personalized travel bag doesn’t have to be. If you’re dreaming of a durable, spacious bag perfectly suited to your needs, learning how to sew a travel bag is the answer. A simple duffel bag style can be completed in a weekend, and the satisfaction of carrying something you created yourself is unmatched.
This comprehensive guide will walk you through every step of sewing your own travel bag, from choosing fabrics and patterns to adding finishing touches. We’ll cover everything a beginner needs to know, and also offer advanced tips for customizing your bag to perfection. By the end of this guide, you’ll have a beautiful, functional travel bag ready for your next adventure.
What You’ll Need for Sewing a Travel Bag
| Item | Quantity | Specifications |
|---|---|---|
| Fabric (Outer) | 2-3 yards | Durable woven fabric like canvas, duck cloth, or upholstery fabric. Consider water resistance. |
| Fabric (Lining) | 2-3 yards | Lightweight cotton or quilting fabric. |
| Interfacing | 1-2 yards | Heavyweight fusible interfacing for structure. |
| Webbing | 2-3 yards | 1.5” or 2” wide for straps and handles. |
| Zipper | 24” – 36” | Heavy-duty zipper for the main compartment. |
| Zipper (Pocket) | 8” – 12” | For interior or exterior pockets. |
| Buckles/Sliders | 2 | For adjustable straps (optional). |
| Thread | 1 spool | Heavy-duty thread matching your fabric. |
| Sewing Machine | 1 | With a sturdy needle suitable for thick fabrics. |
| Fabric Scissors | 1 | Sharp scissors for accurate cutting. |
| Measuring Tape | 1 | For precise measurements. |
| Pins | 1 box | For holding fabric layers together. |
| Seam Ripper | 1 | For correcting mistakes. |
| Iron & Ironing Board | 1 | For fusing interfacing and pressing seams. |
Preparing Your Fabric and Pattern
Choosing the Right Fabric
The most important factor is durability. Canvas, duck cloth, and upholstery fabrics are excellent choices for the outer layer. They can withstand wear and tear and offer a professional look. For the lining, a lightweight cotton or quilting fabric is ideal; it’s easy to work with and adds a finished touch. Consider a water-resistant fabric or a fabric protector spray for added protection against spills and rain.
Finding a Pattern
You can find free or paid travel bag patterns online. Search for “duffel bag sewing pattern” or “weekender bag pattern.” Alternatively, you can draft your own pattern based on your desired dimensions. A simple rectangular shape is easiest for beginners. Consider the size you need – a smaller bag for overnight trips or a larger one for longer journeys.
Cutting the Fabric
Carefully follow the pattern instructions for cutting your fabric. Remember to add seam allowances (typically ½ inch) to all edges. Cut out the outer fabric, lining fabric, interfacing pieces, and any pocket pieces according to the pattern. Pay close attention to directional prints, ensuring they are aligned correctly.
Step-by-Step Sewing Process
Phase 1: Preparing the Bag Panels
Interfacing Application
- Fuse the fusible interfacing to the wrong side of your outer fabric pieces. This provides structure and support. Follow the manufacturer’s instructions for fusing, typically using a medium heat setting and pressing firmly.
- Ensure the interfacing is smoothly applied without bubbles or wrinkles.
Pocket Construction (Optional)
- Sew any interior or exterior pockets onto the lining fabric pieces. Use a zipper or simple folded pocket construction.
- Reinforce the pocket attachment points with extra stitching.
Phase 2: Assembling the Bag Body
Sewing the Outer Bag
- With right sides together, pin and sew the side seams of the outer fabric pieces.
- Reinforce the seams with a second row of stitching.
- Repeat for the bottom seam.
Sewing the Lining Bag
- Repeat the process for the lining fabric pieces, leaving a 6-8 inch opening in the bottom seam for turning the bag right-side out.
- Do not sew the bottom seam closed.
Phase 3: Attaching Handles and Straps
Handle Preparation
- Fold the webbing for the handles in half lengthwise and press.
- Topstitch along the open edges to create a finished look.
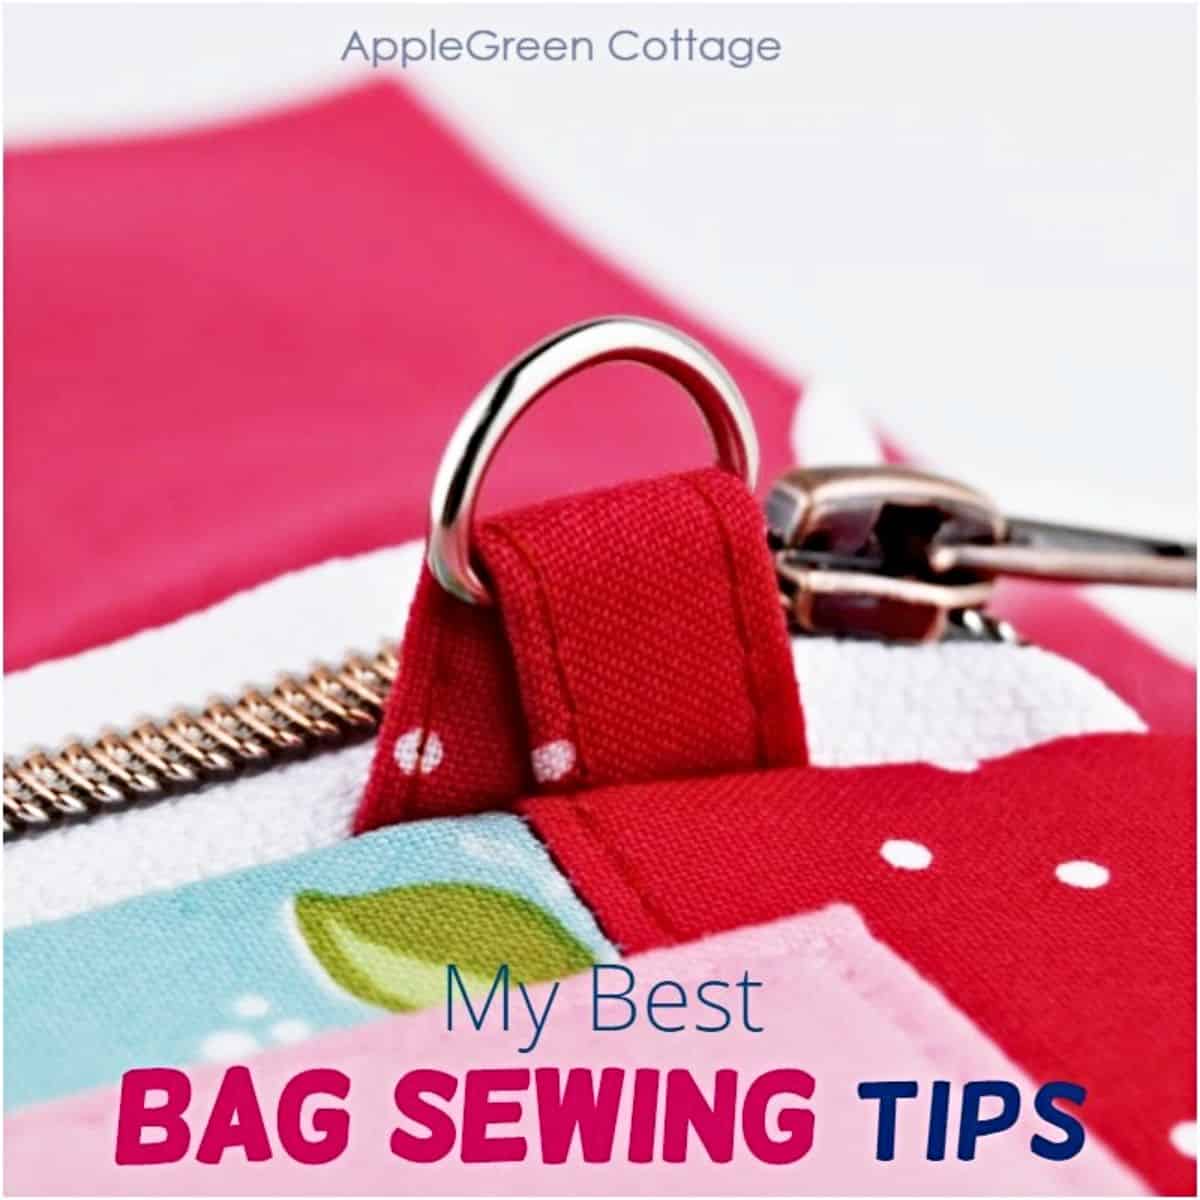
Handle Attachment
- Position the handles evenly spaced on the outside of the bag.
- Pin securely and stitch them to the bag, reinforcing the attachment points with multiple rows of stitching or rivets.
Shoulder Strap (Optional)
- If adding a shoulder strap, attach buckles or sliders to the webbing.
- Attach the strap to the bag body using similar reinforcement techniques as the handles.
Phase 4: Finishing the Bag
Attaching the Zipper
- Pin the zipper to the top edge of the outer bag, right sides together.
- Sew the zipper in place, using a zipper foot.
- Repeat for the lining bag, aligning the zipper with the top edge.
Joining Outer and Lining
- Place the outer bag inside the lining bag, right sides together.
- Pin around the top edge, aligning the zipper.
- Sew around the entire perimeter, leaving the turning opening in the lining bottom seam open.
Turning and Closing
- Carefully turn the bag right-side out through the opening in the lining bottom seam.
- Press the seams neatly.
- Hand-stitch the opening in the lining closed using a blind stitch.
Pro Tips for a Professional Finish
- Reinforce Stress Points: Add extra stitching at handle attachments, zipper ends, and corners to prevent tearing.
- Use Heavy-Duty Thread: Choose a strong thread specifically designed for heavy fabrics.
- Press As You Go: Pressing seams flat after each step creates a cleaner, more professional finish.
- Topstitching: Add topstitching along seams and edges for a polished look and added durability.
- Waterproofing: Apply a fabric protector spray to the finished bag for water resistance.
- Personalize: Add patches, embroidery, or decorative trims to customize your bag.
- Consider a Boxy Bottom: Adding gussets to the bottom corners will give your bag more structure and space.
Professional Help
If you encounter difficulties or lack the necessary equipment, consider seeking help from a local seamstress or upholstery shop. They can assist with challenging steps like zipper installation or handle attachment. Typical costs for professional assistance can range from $50-$150 depending on the complexity of the bag and the amount of work required.
FAQ
Q: What fabric is best for a waterproof travel bag?
A: While no fabric is completely waterproof, oilcloth, waxed canvas, or fabrics coated with a waterproof membrane are excellent choices. You can also use a water-resistant fabric and apply a waterproofing spray.
Q: Can I use a regular sewing machine for this project?
A: A sturdy sewing machine capable of handling thick fabrics is essential. If your machine is basic, you might need to use a heavier needle and sew slowly.
Q: How do I install a zipper without it getting stuck?
A: Use a zipper foot and sew slowly, ensuring the zipper teeth are aligned correctly. Test the zipper frequently during installation to prevent issues.
Q: What size should the handles be?
A: Handle length depends on how you prefer to carry the bag. A comfortable length is typically 24-30 inches.
Alternative Solutions
If you find sewing a zipper daunting, consider using Velcro closures or magnetic snaps. These are easier to install but may not be as secure. For a faster project, you can repurpose an old duffel bag and simply add new lining and handles.
Enjoy Your New Travel Bag
Congratulations! You’ve successfully sewn your own travel bag. Now you have a durable, personalized bag that’s perfect for your next adventure.
Here’s a quick recap:
– Choose durable fabrics and a suitable pattern.
– Follow the step-by-step instructions carefully.
– Reinforce stress points for added durability.
– Don’t be afraid to customize your bag with personal touches.
You’ve invested time and effort into creating something special. Take pride in your accomplishment and enjoy using your new travel companion!
Share your travel bag creations with us in the comments below! We’d love to see your designs and hear about your sewing experience.


