
Are you tired of your bag’s contents becoming a chaotic mess? Do you wish you could organize your tote, backpack, or purse more effectively? Adding a divider to your bag is a fantastic way to create separate compartments, keeping your essentials neatly organized and easily accessible. This guide will walk you through the process, starting with a quick fix for simple bags, and progressing to more detailed methods for complex designs.
This comprehensive guide isn’t just about sewing a piece of fabric into your bag. We’ll cover everything from choosing the right materials to different divider styles, ensuring you can create a custom solution perfectly tailored to your needs. By the end of this article, you’ll have the skills and confidence to transform your disorganized bag into a haven of order!
Choosing the Right Divider Style
Before you start, consider what you want to achieve with your divider. Different styles suit different bag types and organizational needs.
- Simple Insert: A single piece of fabric cut to size, perfect for basic tote bags.
- Multi-Compartment Divider: Includes multiple pockets and sections for smaller items.
- Full-Length Divider: Separates the bag into two distinct main compartments.
- Zippered Divider: Offers added security and prevents items from falling between sections.
Materials and Tools Needed

| Item | Quantity | Specifications |
|---|---|---|
| Fabric | Varies | Durable material matching bag’s interior (canvas, duck cloth, felt) |
| Interfacing (Optional) | Varies | Adds stiffness to fabric, especially for simple inserts |
| Zipper (Optional) | 1 | Length depends on divider’s width |
| Thread | 1 spool | Matching bag’s interior/divider fabric |
| Scissors | 1 | Fabric scissors |
| Measuring Tape | 1 | For accurate measurements |
| Pins | 1 box | For securing fabric layers |
| Sewing Machine | 1 | Standard sewing machine |
| Seam Ripper | 1 | For correcting mistakes |
| Ruler or Straight Edge | 1 | For cutting fabric accurately |
How to Sew a Simple Insert Divider

This is the easiest method, ideal for tote bags or adding basic organization.
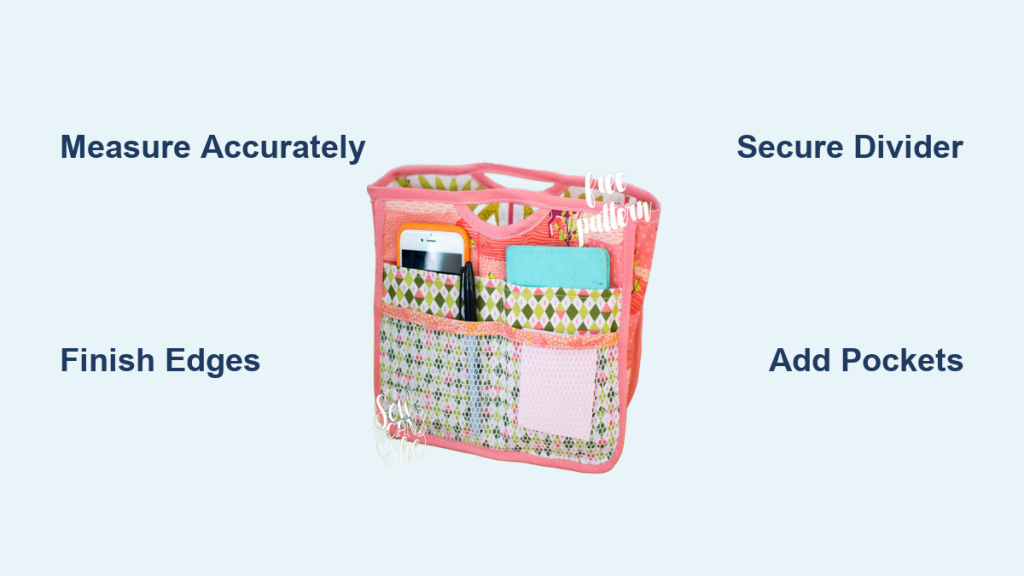
Step 1: Measuring and Cutting the Fabric
- Measure the width and height of the inside of your bag where you want the divider to go.
- Add 1 inch to both dimensions for seam allowance.
- Cut a piece of fabric (and interfacing, if using) to the calculated size.
Step 2: Applying Interfacing (Optional)
- If using interfacing, iron it onto the wrong side of your fabric according to the manufacturer’s instructions. This will give the divider more structure.
Step 3: Finishing the Edges
- Fold over each edge of the fabric by 1/2 inch and press with an iron.
- Fold over again by another 1/2 inch and press.
- Pin the folded edges in place.
- Sew along the folded edges, close to the inner fold, to create a clean finish.
Step 4: Inserting the Divider
- Simply slide the finished divider into your bag. You may want to secure it with fabric glue dots or a few hand stitches at the bottom corners to prevent it from shifting.
How to Sew a Multi-Compartment Divider

This method creates a more complex divider with pockets for smaller items.
Phase 1: Design and Planning
- Sketch your design: Decide how many compartments you want and their sizes.
- Measure and calculate: Determine the dimensions of each pocket and the overall divider.
- Cut the base fabric: Cut a piece of fabric to the overall divider size, adding seam allowance.
Phase 2: Creating the Pockets
- Cut pocket fabric: Cut fabric pieces for each pocket, adding seam allowance.
- Finish pocket edges: Fold over and sew the top edges of each pocket to create a clean finish.
- Pin pockets to base fabric: Arrange the pockets on the base fabric and pin them in place.
- Sew pockets to base fabric: Sew along the sides and bottom of each pocket, leaving the top open.
Phase 3: Assembling the Divider
- Add interfacing (Optional): Apply interfacing to the back of the divider for added stability.
- Finish the divider edges: Fold over and sew the edges of the entire divider, similar to the simple insert method.
Phase 4: Installing the Divider
- Secure the divider inside your bag, using fabric glue or hand stitches.
How to Sew a Zippered Divider
This option is great for security and preventing items from spilling between compartments.
Step 1: Prepare the Fabric
- Cut two pieces of fabric to the desired divider size, adding seam allowance.
- Cut a piece of zipper slightly longer than the divider’s width.
Step 2: Attach the Zipper
- Pin the zipper face down to the right side of one fabric piece, aligning the edges.
- Sew along the zipper, close to the teeth.
- Repeat with the other fabric piece, pinning and sewing on the opposite side of the zipper.
Step 3: Finish the Divider
- Turn the divider right side out.
- Press the divider flat, ensuring the zipper is centered.
- Finish the edges of the divider by folding over and sewing.
Step 4: Installing the Divider
- Secure the divider inside your bag, using fabric glue or hand stitches.
Pro Tips for Sewing Bag Dividers
- Use durable fabric: Choose a fabric that can withstand regular use and the weight of your belongings.
- Reinforce stress points: Add extra stitching at corners and areas where the divider will experience more wear and tear.
- Consider bag lining: Use a fabric that matches the bag’s lining for a seamless look.
- Pre-wash fabric: This prevents shrinkage after sewing.
- Test fit frequently: Check the fit of the divider throughout the process to ensure it fits properly.
- Use contrasting thread: If you want the stitching to be visible, use a contrasting thread color for a decorative effect.
When to Seek Professional Help
- Complex bag construction: If your bag has a complicated lining or structure, it’s best to consult a professional seamstress.
- Expensive bag: If you’re working with a high-value bag, you don’t want to risk damaging it.
- Lack of sewing experience: If you’re new to sewing, a professional can ensure a clean and durable result.
FAQ
Q: What type of fabric should I use?
A: Canvas, duck cloth, or felt are good choices, as they are durable and relatively easy to work with.
Q: Can I use a fabric glue instead of sewing?
A: While fabric glue can be used for some parts, sewing provides a more secure and lasting hold.
Q: How do I prevent the divider from slipping around?
A: Use fabric glue dots or hand stitches to secure the bottom corners of the divider.
Q: Can I add padding to the divider?
A: Yes, you can add a layer of batting or foam between the fabric layers for extra cushioning.
Alternative Solutions
| Solution | Pros | Cons | Best For |
|---|---|---|---|
| Bag Organizers (Purchased) | Quick and easy, no sewing required | May not fit perfectly, limited customization | Quick organization, simple bags |
| Adjustable Dividers | Flexible and adaptable, can be repositioned | Less durable than sewn dividers | Frequent changes in organization |
| Pouches and Cases | Separate small items | Requires individual items, can take up more space | Specific items like electronics or toiletries |
Keep Your Bag Organized!
Congratulations! You’ve now learned how to sew a divider into your bag, bringing order and organization to your daily life. Remember to choose the divider style that best suits your needs, use quality materials, and take your time with the sewing process.
Ready to tackle your disorganized bag? Share your results and any tips you learned in the comments below!


