

Are you looking for a simple and satisfying sewing project? Creating a pouch bag is a fantastic way to practice your skills, use up fabric scraps, and end up with a handy accessory. If you’ve ever wanted to learn how to sew something useful, this is a great place to start – and we’ll walk you through everything you need to know to make a beautiful, functional pouch bag.
This comprehensive guide will take you through every step of the process, from gathering materials to adding finishing touches. We’ll cover different methods for construction, tips for choosing fabrics, and how to customize your pouch to suit your style. By the end of this article, you’ll have the confidence to create pouch bags of all shapes and sizes!
Materials and Tools Needed

| Item | Quantity | Specifications |
|---|---|---|
| Fabric | Varies | Cotton, linen, canvas, or quilting cotton are good choices. Approximately ¼ – ½ yard depending on desired pouch size. |
| Interfacing | Varies | Medium-weight fusible interfacing. Same dimensions as fabric pieces. |
| Lining Fabric | Varies | Same amount as main fabric. |
| Zipper | 1 | Length appropriate for pouch width. (Typically 6-9 inches) |
| Thread | 1 spool | Matching fabric color |
| Sewing Machine | 1 | Standard sewing machine |
| Scissors | 1 pair | Fabric scissors |
| Pins | 1 box | Straight pins |
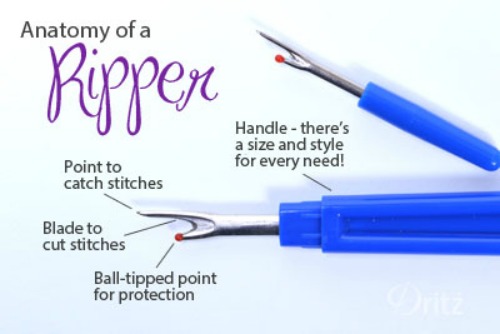
| Seam Ripper | 1 | For correcting mistakes |
| Iron | 1 | For pressing fabric |
| Measuring Tape/Ruler | 1 | For accurate measurements |
| Fabric Marking Pen/Pencil | 1 | For marking cutting lines |
Preparing Your Fabric and Pattern
Determining Pouch Size and Cutting Fabric
- Decide on the dimensions: A common pouch size is 8″ wide x 6″ high, but feel free to adjust this to your preference.
- Cut the main fabric: Cut two rectangles of your chosen fabric to the desired width and height, plus a ½” seam allowance on all sides. (e.g., for an 8″x6″ pouch, cut two 9″x7″ rectangles).
- Cut the lining fabric: Cut two rectangles of lining fabric to the same dimensions as the main fabric.
- Cut the interfacing: Cut two rectangles of fusible interfacing to the same dimensions as the main fabric pieces.
- Fuse the interfacing: Apply the fusible interfacing to the wrong side of the main fabric pieces, following the manufacturer’s instructions. This adds structure and stability to your pouch.
Preparing the Zipper
- Zipper length: Ensure your zipper is slightly shorter than the width of your pouch.
- Optional: Basting: Baste the zipper tape to the right side of one main fabric piece and one lining fabric piece, with the zipper tape edge aligning with the fabric edge. This makes sewing the zipper easier.
Sewing the Pouch – Two Methods
Method 1: Simple Zipper Insertion
Step 1: Attaching the Zipper to the Main Fabric
- Place the zipper face down on the right side of one main fabric piece.
- Pin the zipper tape to the fabric, aligning the edges.
- Using a zipper foot on your sewing machine, stitch the zipper to the fabric, approximately ¼” from the edge.
- Repeat with the other main fabric piece.
Step 2: Attaching the Zipper to the Lining Fabric
- Place the zipper face down on the right side of one lining fabric piece.
- Pin and stitch the zipper to the lining fabric, mirroring the process with the main fabric.
- Repeat with the other lining fabric piece.
Step 3: Joining the Fabric Pieces
- With right sides facing, pin the two main fabric pieces together along the sides and bottom, leaving the top open.
- Stitch around the sides and bottom with a ¼” seam allowance.
- Repeat with the two lining fabric pieces, but leave a 3-4″ opening in the bottom seam for turning the pouch right side out.
Step 4: Finishing and Turning
- Clip the corners to reduce bulk.
- Turn the pouch right side out through the opening in the lining.
- Press the seams.
- Fold the raw edges of the opening inward and press.
- Topstitch the opening closed.
- Tuck the lining inside the main fabric.
Method 2: Zipper Top Pouch (More Advanced)
Step 1: Creating the Zippered Top
- With right sides facing, pin the top edge of each main fabric piece to the zipper tape, leaving a ¼” seam allowance.
- Stitch the fabric to the zipper tape on both sides.
Step 2: Joining the Sides and Bottom
- With right sides facing, pin the side and bottom edges of the main fabric pieces together.
- Stitch around the sides and bottom with a ¼” seam allowance.
Step 3: Lining the Pouch
- With right sides facing, place the lining fabric inside the main fabric pouch.
- Pin the top edges together, aligning the lining and main fabric.
- Stitch around the top edge, leaving a 3-4″ opening for turning.
Step 4: Finishing
- Clip corners and turn right side out through the opening.
- Press the seams and close the opening with a hand stitch or topstitching.
Pro Tips
- Use a zipper foot: This allows you to sew close to the zipper teeth for a clean finish.
- Press as you go: Pressing seams after each step makes for a neater, more professional-looking pouch.
- Choose coordinating fabrics: A contrasting lining can add a pop of color and interest.
- Experiment with different zipper types: Use metal zippers for a more durable pouch or colorful zippers for a playful look.
- Add a key clip or charm: Personalize your pouch with a small embellishment.
- Consider using a heavier weight fabric: This will give your pouch more structure and durability.
- Pre-wash your fabric: This prevents shrinkage after the pouch is finished.
When to Seek Professional Help
While making a pouch bag is a beginner-friendly project, there are times when professional help might be beneficial:
- Complex Zipper Installations: If you’re struggling with a particularly tricky zipper, a tailor can provide assistance.
- Heavy-Duty Fabrics: Working with thick materials like leather or vinyl may require specialized equipment and expertise.
- Large-Scale Production: If you’re planning to make a large batch of pouches, outsourcing to a professional seamstress can save time and effort.
FAQ
Q: What type of fabric is best for a pouch bag?
A: Cotton, linen, canvas, and quilting cotton are all excellent choices. The best fabric depends on the desired look and durability.
Q: Can I use a different type of closure instead of a zipper?
A: Absolutely! You can use snaps, buttons, Velcro, or even a drawstring closure.
Q: How do I prevent the zipper from getting stuck?
A: Use a zipper lubricant or wax to keep the zipper running smoothly.
Q: How can I make my pouch more structured?
A: Use fusible interfacing or a heavier weight fabric.
Alternative Solutions
If you’re finding zippers intimidating, consider starting with a pouch that uses a button or snap closure. These are simpler to install and can still create a functional and stylish bag. Another option is to explore pre-made pouch kits, which include all the necessary materials and instructions.
Enjoy Your New Pouch Bag!
Congratulations on completing your pouch bag! Now you have a stylish and practical accessory that you made with your own two hands. Follow these steps, and you’ll be able to create countless pouches in different sizes, colors, and styles.
What are you waiting for? Grab your fabric and start sewing! Share your finished pouch bags with us in the comments below – we’d love to see your creations!


