
Are you looking to create a stylish and practical square bag? Perhaps you’re tired of flimsy store-bought bags and want to make something durable and uniquely yours. A simple square bag is a fantastic beginner sewing project, and with the right guidance, you can have a finished bag in an afternoon. This guide will walk you through the entire process, from cutting the fabric to adding the final touches.
This comprehensive guide will go far beyond the basic steps. We’ll explore different fabric choices, lining options, strap construction, and even a few embellishment ideas to personalize your creation. By the end of this article, you’ll have the knowledge and confidence to sew a beautiful, functional square bag you’ll be proud to carry.
Materials and Tools Needed
| Item | Quantity | Specifications |
|---|---|---|
| Fabric (Outer) | 1 yard | Cotton, Canvas, Denim, or similar medium-weight fabric |
| Fabric (Lining) | 1 yard | Lightweight cotton, quilting cotton, or broadcloth |
| Interfacing (Optional) | 1 yard | Fusible interfacing for added structure (medium-weight) |
| Straps (Pre-made or Fabric) | 2 yards | 1″ – 2″ wide webbing, leather, or fabric for straps |
| Thread | 1 spool | Matching your fabric color |
| Sewing Machine | 1 | With standard presser foot |
| Scissors or Rotary Cutter | 1 | For cutting fabric |
| Cutting Mat (if using rotary cutter) | 1 | |
| Ruler or Measuring Tape | 1 | Accurate measurements are essential |
| Pins or Clips | 20-30 | To hold fabric layers together |
| Iron & Ironing Board | 1 | For pressing seams |
| Seam Ripper | 1 | Just in case! |
| Safety Pins | 2 | For attaching straps |
Preparing Your Fabric
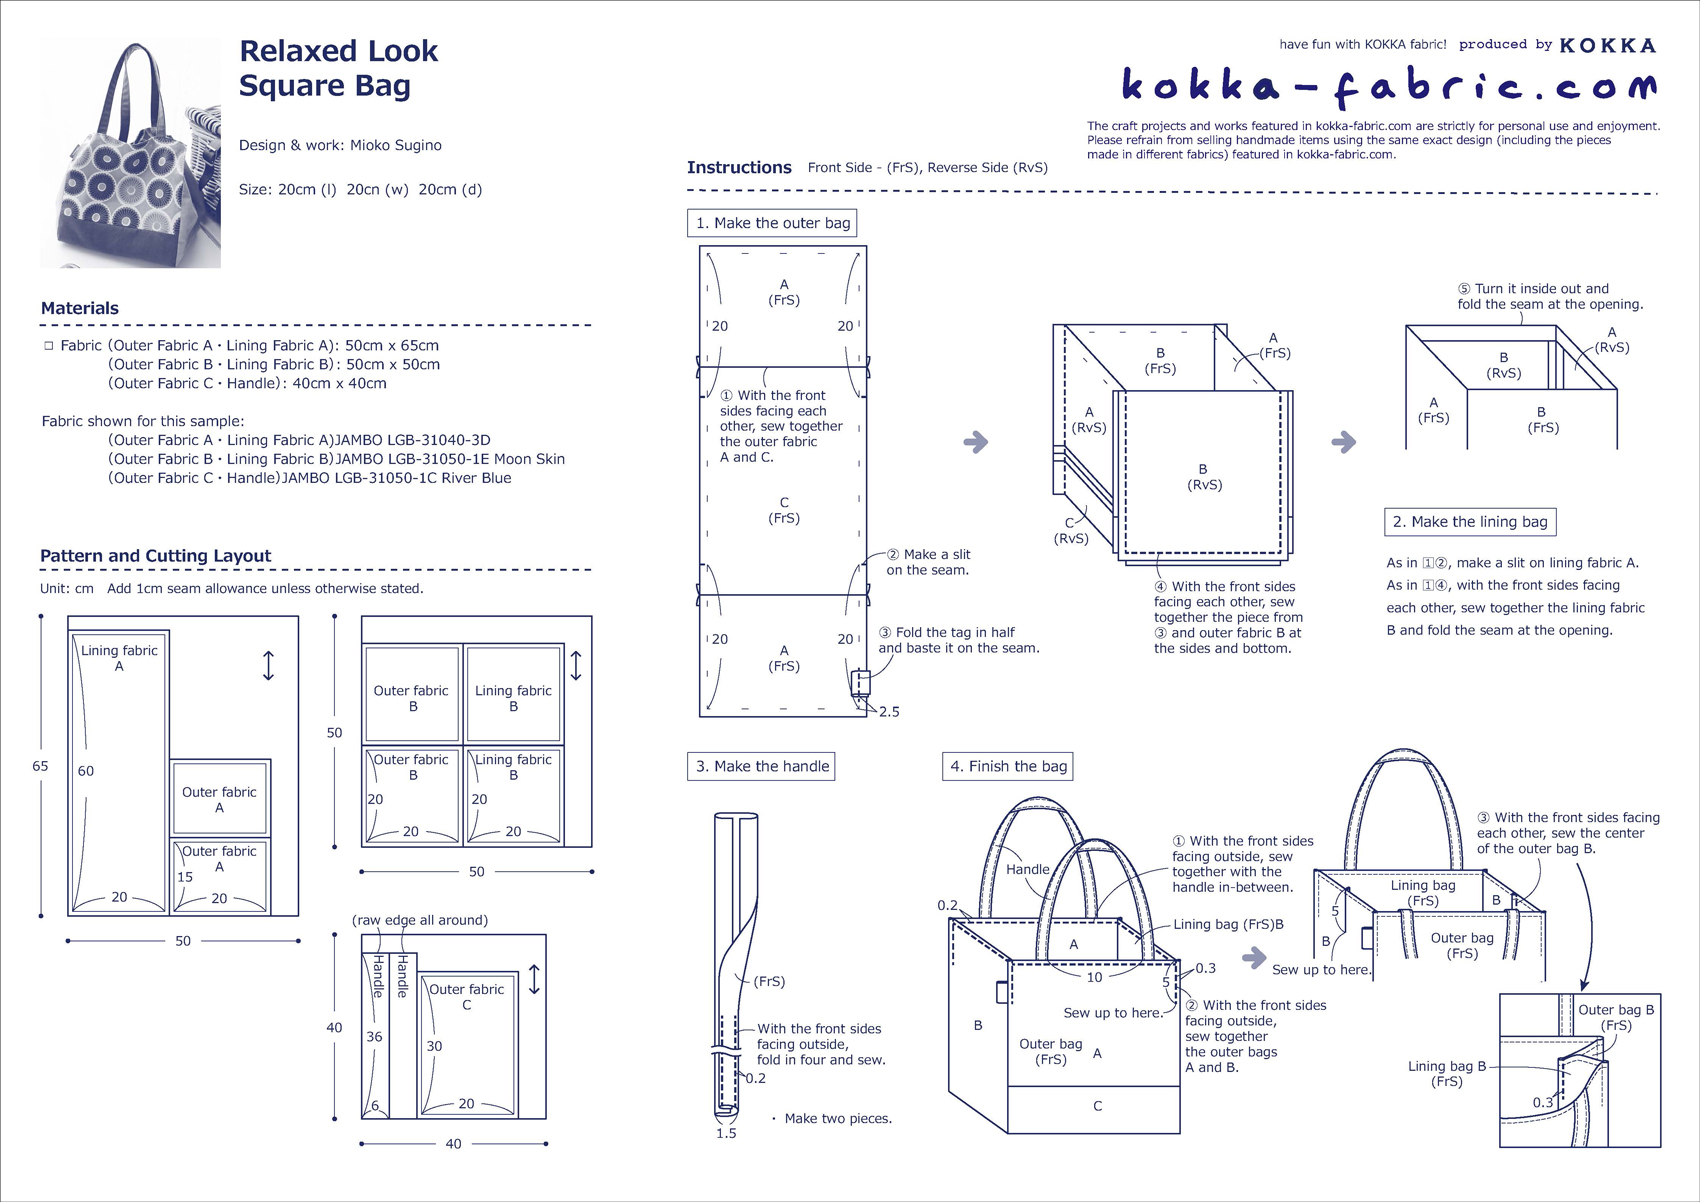
Cutting the Fabric Pieces
- Determine Bag Size: Decide on the desired dimensions of your finished bag. For this example, we’ll aim for a bag that is 12″ wide x 14″ high x 4″ deep. Add seam allowances (typically ½ inch) to all sides.
- Cut Outer Fabric: Cut two rectangles of outer fabric measuring 13″ x 15″.
- Cut Lining Fabric: Cut two rectangles of lining fabric measuring 13″ x 15″.
- Cut Interfacing (Optional): If using interfacing, cut two rectangles measuring 13″ x 15″. Fuse the interfacing to the wrong side of the outer fabric pieces. This adds structure and stability.
- Cut Bottom Piece: Cut one rectangle of outer fabric measuring 13″ x 4″. Cut one rectangle of lining fabric measuring 13″ x 4″.
- Cut Strap (if making your own): Cut two strips of fabric (or use pre-made webbing) approximately 2″ wide and 28″ long.
Preparing the Straps
If you’re making your own straps:
- Fold and Press: Fold each strap piece in half lengthwise, wrong sides together, and press.
- Fold Again: Fold each long edge towards the center crease and press again.
- Fold One Last Time: Fold the strap in half again, enclosing the raw edges, and press.
- Topstitch: Topstitch along both long edges of each strap to secure the folds. This creates a clean, durable strap.
Sewing the Bag – Step-by-Step
Phase 1: Constructing the Bag Body
- Sew Side Seams (Outer Fabric): Place the two outer fabric rectangles right sides together. Pin along both side seams. Sew with a ½ inch seam allowance. Press seams open.
- Sew Side Seams (Lining Fabric): Repeat step 1 with the two lining fabric rectangles, leaving a 4-inch opening in the bottom seam of one side. This opening is essential for turning the bag right side out later. Press seams open.
- Sew Bottom to Body (Outer Fabric): Pin the bottom piece to the bottom edge of the outer fabric body, right sides together. Sew with a ½ inch seam allowance. Press seam open.
- Sew Bottom to Body (Lining Fabric): Repeat step 3 with the bottom piece and lining fabric body. Press seam open.
Phase 2: Assembling the Bag
- Box the Corners: To create a flat bottom, box the corners of both the outer fabric and the lining. Flatten each corner so that the side seam aligns with the bottom seam. Measure 2 inches from the point and draw a line across. Sew along this line. Cut off the excess fabric, leaving a ½ inch seam allowance. Repeat for all four corners.
- Attach Straps: Position the straps on the top edge of the outer fabric bag body, approximately 4 inches apart. Pin securely. Topstitch the straps in place, reinforcing the attachment with a box stitch or multiple lines of stitching.
- Insert Lining: Turn the outer bag right side out. Place the lining inside the outer bag, wrong sides together. Align the top edges of the outer fabric and lining.
Phase 3: Finishing the Bag
- Pin and Sew Top Edge: Pin the lining and outer fabric together around the top edge. Sew around the entire top edge with a ½ inch seam allowance, leaving the 4-inch opening in the lining.
- Turn Right Side Out: Carefully turn the bag right side out through the opening in the lining.
- Close the Opening: Fold the edges of the opening in the lining inward and press. Hand-stitch the opening closed with a blind stitch for a clean finish.
- Press and Finish: Press the finished bag to give it a professional look.
Pro Tips

- Fabric Choice: Canvas and denim are excellent choices for durability. Cotton is great for lighter-weight bags.
- Interfacing: Don’t skip interfacing if you want a bag that holds its shape well.
- Reinforced Straps: Add extra stitching to the strap attachment points for increased strength.
- Pocket Power: Consider adding an interior pocket to the lining for small items.
- Embellishments: Personalize your bag with embroidery, patches, or fabric paint.
- Seam Allowance Consistency: Maintaining a consistent seam allowance is crucial for a neat finish.
Professional Help
If you’re struggling with a particular step or need assistance with strap attachment, consider:
- Local Sewing Classes: Many fabric stores offer classes for beginners.
- Seamstress/Tailor: A professional can provide guidance or complete the project for you.
- Online Sewing Communities: Forums and social media groups can offer helpful advice.
Typical costs for professional help can range from $20-$50 per hour, depending on the complexity of the task and your location.
FAQ
Q: Can I use different types of fabric for the outer and lining?
A: Absolutely! Combining different fabrics can create a unique look and feel. Just ensure the fabrics are compatible in terms of weight and washability.
Q: What if I don’t have interfacing?
A: You can still make the bag without interfacing, but it will be less structured.
Q: How can I make the bag more waterproof?
A: Use a water-resistant fabric for the outer layer or apply a fabric protector spray.
Q: Can I add a zipper closure?
A: Yes, but it will require more advanced sewing skills. There are many tutorials available online for adding zippers to bags.
Alternative Solutions

If you find sewing a bag too challenging, consider purchasing a pre-made canvas tote bag and customizing it with paint, patches, or embroidery. Alternatively, repurpose an old t-shirt or pair of jeans into a tote bag.
| Solution | Pros | Cons | Best For |
|---|---|---|---|
| Pre-made Tote Customization | Quick, easy, affordable | Limited design options | Beginners, quick projects |
| Repurposed Fabric | Sustainable, cost-effective | Requires fabric manipulation skills | Eco-conscious crafters |
Keep Your Square Bag Looking Its Best
Congratulations! You’ve successfully sewn a square bag. Here’s how to keep it in top condition:
- Spot clean stains with a damp cloth.
- Hand wash gently if necessary.
- Air dry flat to prevent shrinkage.
- Store your bag in a cool, dry place.
Following these simple steps will ensure your handmade square bag lasts for years to come.
Have you sewn a square bag? Share your experience and any tips you have in the comments below!


