
Nobody enjoys opening a hockey bag and being hit with a wall of unpleasant smells. A dirty, smelly hockey bag isn’t just unpleasant, it can also harbor bacteria. Fortunately, a thorough cleaning doesn’t have to be a daunting task. This guide will walk you through a quick fix to neutralize immediate odors, and then a comprehensive cleaning process to eliminate lingering smells and grime, ensuring your hockey bag stays fresh and hygienic.
This comprehensive guide will cover everything from quick odor-neutralizing sprays to a deep cleaning process involving removal of liners, washing techniques, and effective drying methods. We’ll also explore preventative measures to keep your bag cleaner for longer, and address specific stains and tough odors. By the end of this article, you’ll have the knowledge and tools to tackle even the most challenging hockey bag cleaning situation.
Common Causes of a Smelly Hockey Bag
The source of hockey bag odor is often multifaceted:
- Sweat: The primary culprit. Hockey is strenuous, and sweat soaks into gear and the bag itself.
- Bacteria: Sweat provides a breeding ground for odor-causing bacteria.
- Moisture: Damp gear encourages bacteria growth and mildew formation.
- Gear Odor: Pads, skates, and clothing retain their own smells, contributing to the overall odor.
- Dirt & Debris: Ice shavings, dirt, and other debris accumulate and contribute to the smell.
How to Clean a Hockey Bag: A Step-by-Step Guide
Materials and Tools Needed
| Item | Quantity | Specifications |
|---|---|---|
| Large Tub or Bucket | 1 | Large enough to submerge liners |
| Mild Detergent | 1 Bottle | Laundry detergent or specialized sports gear wash |
| Baking Soda | 1 Box | For odor absorption |
| White Vinegar | 1 Bottle | For disinfecting and odor removal |
| Spray Bottle | 1 | For diluted vinegar solution |
| Soft-Bristled Brush | 1 | For scrubbing interior |
| Vacuum with Hose Attachment | 1 | For removing loose debris |
| Microfiber Cloths | Several | For wiping surfaces |
| Disinfectant Spray | 1 Bottle | Optional, for extra sanitation |
| Gloves | 1 Pair | To protect hands |
Phase 1: Initial Preparation & Debris Removal
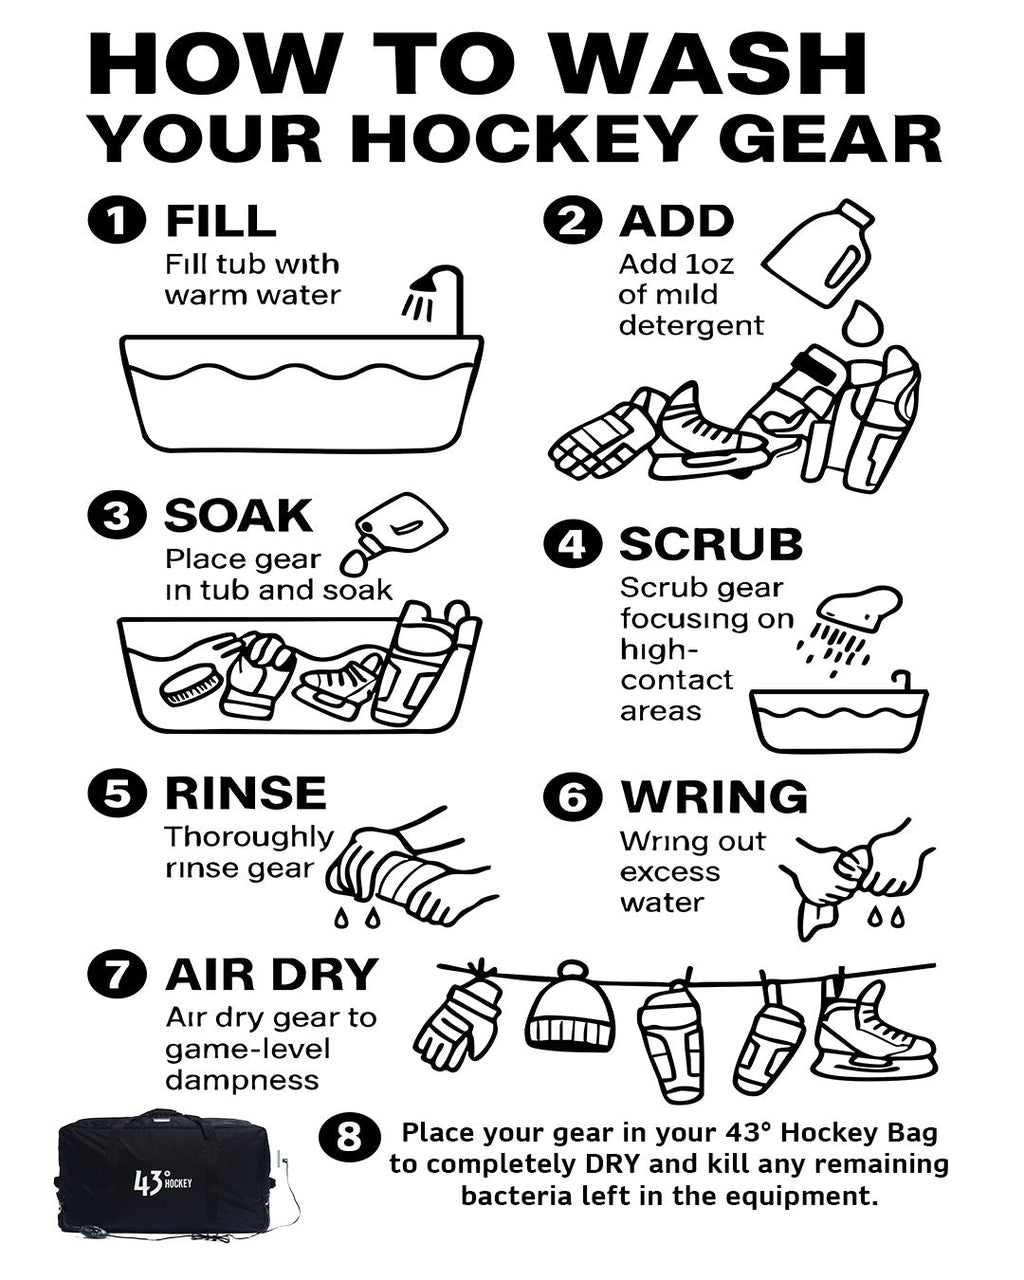
- Empty the Bag Completely: Remove all gear – skates, pads, helmet, etc. This is crucial for a thorough cleaning.
- Shake Out Loose Debris: Turn the bag upside down and shake vigorously to remove loose dirt, ice shavings, and debris.
- Vacuum the Interior: Use the hose attachment of your vacuum to thoroughly vacuum the inside of the bag, paying attention to corners and seams.
Phase 2: Liner Removal and Washing
- Remove the Liner (If Possible): Many hockey bags have removable liners. Carefully detach it. Check your bag’s manual if unsure how to remove it.
- Wash the Liner:
- Hand Wash: Fill the tub with lukewarm water and add a small amount of mild detergent. Submerge the liner and gently agitate. Rinse thoroughly with clean water.
- Machine Wash (If Applicable): Check the liner’s care label. If machine washable, use a delicate cycle with cold water and mild detergent.
- Dry the Liner: Hang the liner to air dry completely. Avoid using a dryer, as heat can damage the material.
Phase 3: Cleaning the Bag Interior

- Vinegar Solution: Mix equal parts white vinegar and water in a spray bottle.
- Spray and Scrub: Generously spray the interior of the bag with the vinegar solution. Let it sit for 10-15 minutes to disinfect and loosen grime.
- Scrub: Use a soft-bristled brush to scrub the interior of the bag, focusing on areas with visible dirt or stains.
- Rinse (If Possible): If your bag’s material allows (check the manufacturer’s instructions), lightly rinse the interior with clean water. Avoid saturating the bag.
- Baking Soda Application: Sprinkle a generous amount of baking soda all over the interior of the bag. This will help absorb any remaining odors. Let it sit overnight.
Phase 4: Drying and Final Touches
- Vacuum Baking Soda: After letting the baking soda sit overnight, vacuum it out of the bag thoroughly.
- Air Dry Completely: This is essential. Leave the bag open in a well-ventilated area to air dry completely. Avoid direct sunlight, which can fade the material. Ensure no moisture remains before storing gear.
- Disinfect (Optional): For extra sanitation, lightly spray the interior with a disinfectant spray.
Pro Tips for Hockey Bag Maintenance
- Air it Out Regularly: After each practice or game, open the bag and let it air out to prevent moisture buildup.
- Dry Gear Before Storing: Always dry your gear as much as possible before placing it in the bag.
- Use Gear Vents: Utilize any ventilation features on your gear to promote airflow.
- Odor Absorbers: Place odor-absorbing pouches (baking soda, charcoal) inside the bag when not in use.
- Regular Wipe Downs: Wipe down the interior of the bag with a damp cloth after each use to remove surface dirt.
- Dedicated Skate Pocket: Use a dedicated skate pocket or skate guards to protect the bag’s interior from skate blades.
Professional Help Section

Sometimes, despite your best efforts, a hockey bag may require professional cleaning.
- Signs to Seek Professional Help: Persistent odors that won’t go away, mold or mildew growth, significant stains, or a bag made of delicate materials.
- What to Look For in a Service Provider: A cleaning service specializing in sports equipment, positive reviews, and experience with hockey bag cleaning.
- Typical Cost Ranges: $30 – $80 depending on the size and condition of the bag.
- Warranty Considerations: Check your bag’s warranty before using professional cleaning services, as some may void the warranty.
FAQ Section
Q: How often should I clean my hockey bag?
A: Ideally, you should deep clean your hockey bag at least once per season. More frequent cleaning (every few weeks) is recommended for heavy users or those in humid climates.
Q: Can I use bleach to clean my hockey bag?
A: Avoid using bleach, as it can damage the bag’s material and cause discoloration.
Q: What’s the best way to dry a hockey bag quickly?
A: Air drying is the safest method. Using a fan can help speed up the process, but avoid direct heat.
Q: My bag still smells after cleaning. What should I do?
A: Repeat the vinegar and baking soda treatment. Consider using a specialized sports gear odor eliminator.
Q: Can I put my hockey bag in the washing machine?
A: It depends on the bag’s material and construction. Check the manufacturer’s instructions. Many bags are not machine washable.
Alternative Solutions Section
| Solution | Pros | Cons | Best For |
|---|---|---|---|
| Odor-Eliminating Sprays | Convenient, quick fix | Doesn’t address the root cause, temporary relief | Light odors, quick touch-ups |
| Ozone Generators | Powerful odor removal | Can be expensive, requires caution | Severe odors, persistent smells |
| Specialized Sports Gear Wash | Designed for synthetic materials, effective cleaning | Can be more expensive than general detergents | Deep cleaning, regular maintenance |
Keep Your Hockey Bag Running Smoothly
By following these steps, you can effectively clean your hockey bag, eliminate unpleasant odors, and extend its lifespan. Remember, regular maintenance is key to preventing buildup and keeping your gear fresh. Don’t let a smelly bag detract from your enjoyment of the game.
Have you tried these cleaning methods? Share your experience or any other tips you have in the comments below!


