
Are you looking for a quick and easy sewing project? A cinch bag is a fantastic option – perfect for gym clothes, carrying snacks, or even a lightweight travel bag. If you’ve ever struggled with getting started, or finding a clear, step-by-step guide, you’re in the right place. We’ll start with a quick overview of the materials you’ll need and then dive into a detailed sewing tutorial.
This comprehensive guide will take you through every step of sewing a cinch bag, from cutting the fabric to adding the drawstring. We’ll cover different fabric options, essential tools, and even tips for customizing your bag. By the end of this article, you’ll have a beautiful, functional cinch bag you can be proud of, and the confidence to make more!
What You’ll Need for Sewing a Cinch Bag
| Item | Quantity | Specifications |
|---|---|---|
| Fabric | 1/2 – 1 yard | Cotton, canvas, denim, or ripstop nylon work well. Consider fabric weight. |
| Drawstring | 2 yards | Cord, ribbon, or twill tape. 1/4″ – 1/2″ width is ideal. |
| Safety Pin | 1 | Large size, for threading the drawstring. |
| Sewing Machine | 1 | Standard sewing machine with a straight stitch. |
| Thread | 1 spool | Matching the fabric color. |
| Fabric Scissors | 1 | Sharp scissors for accurate cutting. |
| Measuring Tape | 1 | For precise measurements. |
| Iron & Ironing Board | 1 each | For pressing seams. |
| Seam Ripper | 1 | For correcting mistakes (always handy!). |
| Pins or Clips | 20-30 | To hold fabric layers together. |
Preparing Your Fabric and Pattern
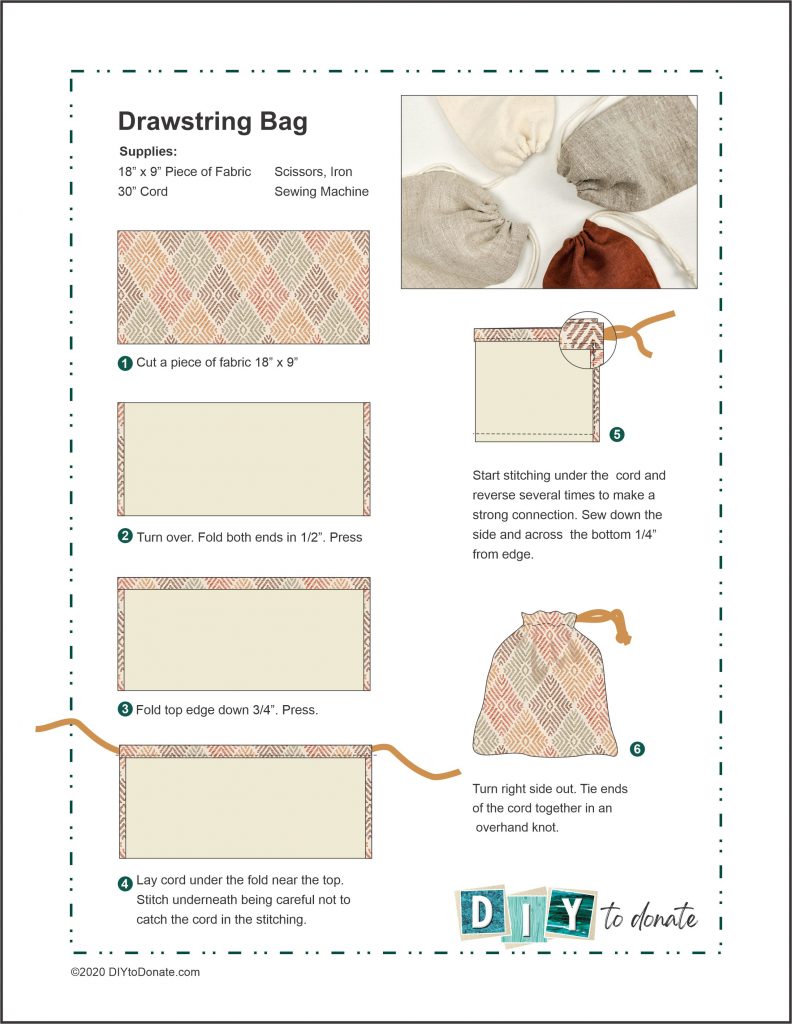
Cutting the Fabric
- Determine Bag Size: A common size is 16” wide x 20” tall, but adjust to your preference. This will create a bag approximately 8” wide when cinched.
- Cut Two Rectangles: Cut two rectangles of fabric to your desired dimensions. For example, two 16” x 20” rectangles.
- Prepare Casing: Add 2.5″ to the top of each rectangle for the drawstring casing. So, if your bag is 20″ tall, your fabric rectangles should be 22.5″ tall.
Preparing the Drawstring
- Cut Drawstring: Cut two pieces of drawstring, each approximately 36” long (adjust based on bag size and desired tie length).
- Secure Ends: If using cord, consider adding heat-shrink tubing or wrapping with tape to prevent fraying.
Step-by-Step Sewing Process
Phase 1: Constructing the Bag Body
- Right Sides Together: Place the two fabric rectangles right sides together, aligning all edges.
- Pin Sides & Bottom: Pin or clip the sides and bottom edges together, leaving the top edge open for the drawstring casing.
- Sew Sides & Bottom: Using a ½” seam allowance, sew along the sides and bottom edges. Backstitch at the beginning and end of each seam to secure the stitches.
- Finish Seams: Finish the raw edges of the seams using a zig-zag stitch, serger, or pinking shears to prevent fraying.
Phase 2: Creating the Drawstring Casing
- Fold Over Top Edge: Fold the top edge of the bag down by 1.25” towards the wrong side of the fabric. Press with an iron.
- Fold Again: Fold the top edge down again by 1.25”, encasing the raw edge within the fold. Press again. This creates the drawstring casing.
- Pin Casing: Pin or clip the folded casing in place all the way around the top of the bag.
- Sew Casing: Sew around the perimeter of the folded casing, close to the bottom edge of the fold. Leave a 2-3” opening on one side for inserting the drawstring. Backstitch at the beginning and end.
Phase 3: Inserting the Drawstring
- Attach Safety Pin: Attach a large safety pin to one end of each drawstring piece.
- Thread Drawstring: Carefully thread one drawstring through the casing, starting from the opening you left. Work the safety pin around the entire casing until the drawstring emerges from the other side of the opening.
- Repeat for Second Drawstring: Repeat the process with the second drawstring.
- Secure Drawstring Ends: Remove the safety pins. Tie the two ends of each drawstring together in a secure knot.
- Close Casing Opening: Fold the edges of the opening inward and pin closed. Topstitch across the opening to seal it securely.
Pro Tips for a Perfect Cinch Bag
- Fabric Choice: Consider the bag’s intended use. Canvas or denim are durable for heavier items, while cotton is lighter and easier to sew. Ripstop nylon is ideal for water resistance.
- Seam Allowance: Consistent seam allowance is crucial for a neat finish. Use a seam gauge for accuracy.
- Reinforced Stress Points: Reinforce the corners where the sides and bottom meet with extra stitching for added durability.
- Decorative Touches: Add embellishments like patches, embroidery, or fabric paint to personalize your bag!
- Drawstring Length: Experiment with drawstring length to achieve your desired cinch and tie length.
- Pre-Wash Fabric: Pre-wash your fabric to prevent shrinkage after sewing.
- Use Clips Instead of Pins: Clips are especially helpful when working with thicker fabrics or slippery materials.
When to Seek Professional Help
If you’re struggling with the sewing machine, consistently making crooked seams, or feel overwhelmed by the process, don’t hesitate to seek help from a local seamstress or sewing instructor. They can provide personalized guidance and ensure a professional finish. For a simple cinch bag, professional help is usually unnecessary, but can be beneficial for beginners.
FAQ
Q: What fabric is best for a cinch bag?
A: Cotton is a good all-around choice for beginners. Canvas and denim are more durable, while ripstop nylon offers water resistance.
Q: How long should the drawstring be?
A: Around 36 inches is a good starting point, but adjust based on your bag size and desired tie length. It’s better to have too much than too little – you can always trim it.
Q: Can I use ribbon instead of cord for the drawstring?
A: Yes! Ribbon can create a more decorative look, but ensure it’s sturdy enough to withstand use.
Q: How do I prevent the drawstring from slipping out of the casing?
A: Ensure the casing is sewn securely and the opening is closed tightly. You can also add a small knot at the end of each drawstring inside the casing.
Alternative Solutions
If you don’t have a sewing machine, you can hand-sew a cinch bag, but it will take considerably longer. Another option is to use fabric glue, but the bag will be less durable.
Get Your Cinch Bag Working Again!
You’ve now learned how to sew a cinch bag from start to finish! Remember to take your time, follow the steps carefully, and don’t be afraid to experiment with different fabrics and embellishments.
Ready to show off your creation? Share a picture of your finished cinch bag in the comments below! We’d love to see it.


