
Dealing with leaks and odors from cloth diapers, swimsuits, or sweaty gym clothes is a hassle. A wet bag offers a convenient, reusable solution, and sewing your own allows for customization and savings. This guide will walk you through how to sew a wet bag, even if you’re a beginner. We’ll start with a quick fix for a simple bag and then explore more advanced features for added functionality.
This comprehensive guide will cover everything from fabric selection and essential tools to a step-by-step sewing process. We’ll also explore different closure options, lining materials, and tips for creating a durable and leak-proof wet bag that will last. By the end of this article, you’ll be equipped to create a variety of wet bags tailored to your specific needs.
Materials and Tools Needed
| Item | Quantity | Specifications |
|---|---|---|
| Outer Fabric | ½ yard | PUL (Polyurethane Laminate), Cotton, or Nylon |
| Lining Fabric | ½ yard | Fleece, Flannel, or Cotton |
| Closure | 1 | Snap, Zipper, or Velcro |
| PUL Fabric (for lining) | ¼ yard | If not using fleece/flannel as lining |
| Coordinating Thread | 1 spool | Polyester or Nylon |
| Fabric Scissors | 1 | Sharp scissors dedicated to fabric |
| Rotary Cutter & Mat | 1 | Optional, for precise cutting |
| Ruler/Measuring Tape | 1 | For accurate measurements |
| Sewing Machine | 1 | Standard sewing machine |
| Pins or Clips | 20-30 | To hold fabric layers together |
| Iron | 1 | For pressing seams |
| Snap Setter/Pliers (if using snaps) | 1 | For attaching snaps |
Preparing Your Fabric and Pattern

Before you start sewing, you’ll need to prepare your fabric and pattern.
Step 1: Choosing Your Fabric
- Outer Fabric: PUL is the most waterproof and recommended for cloth diaper wet bags. Cotton and nylon are good options for lighter-duty bags like swimwear or gym clothes.
- Lining Fabric: Fleece and flannel are soft and absorbent, ideal for cloth diapers. PUL is also a good option for extra leak protection.
- Important: When working with PUL, use a walking foot on your sewing machine to prevent sticking.
Step 2: Creating a Pattern
You can find free wet bag patterns online (search “free wet bag pattern”) or create your own. A common size is 12″ x 18″.
Here’s a simple rectangle pattern:
1. Cut two rectangles of outer fabric (12″ x 18″).
2. Cut two rectangles of lining fabric (12″ x 18″).
Step-by-Step Sewing Process
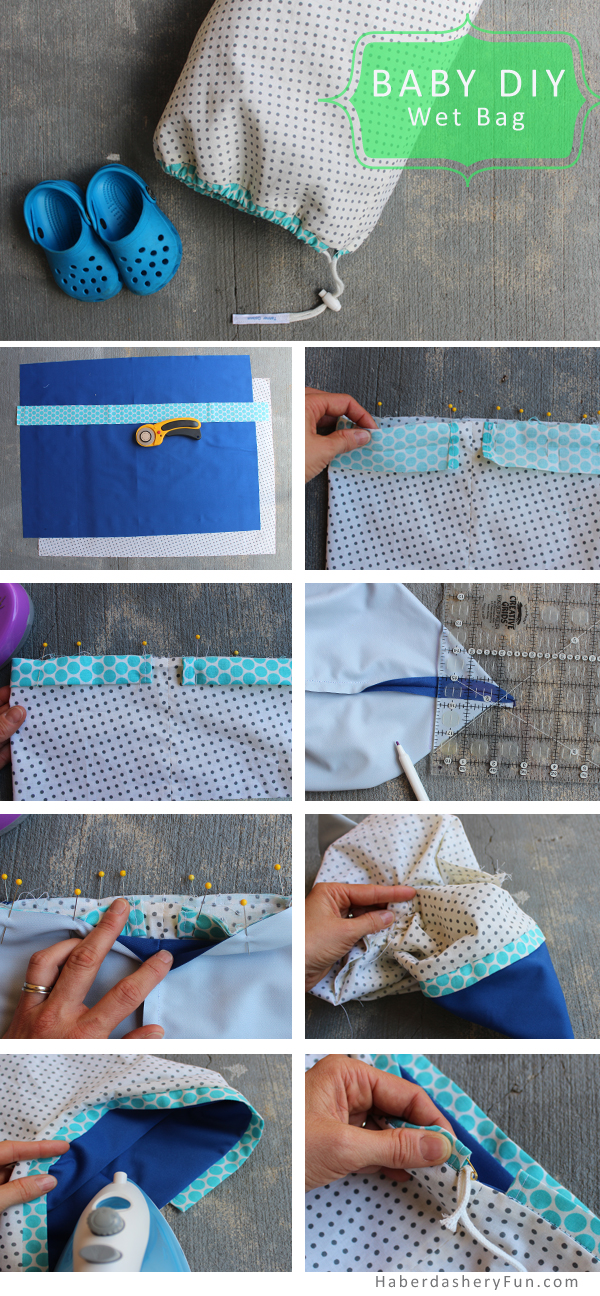
Phase 1: Preparing the Fabric Pieces
- Cut Fabric: Using your chosen pattern, cut out the fabric pieces for both the outer layer and the lining.
- Prepare PUL (if used): If you’re using PUL, gently iron it on a low setting (use a pressing cloth!) to remove any wrinkles. Avoid high heat as it can damage the laminate.
- Pinning: Pin the outer fabric pieces right sides together. Repeat with the lining fabric pieces.
Phase 2: Sewing the Bag
- Sew Outer Layer: Sew around three sides of the outer fabric pieces, leaving one 18″ side open. Use a ½” seam allowance. Backstitch at the beginning and end of each seam.
- Sew Lining Layer: Sew around three sides of the lining fabric pieces, leaving a 4″ opening on one of the 18″ sides. This opening will be used for turning the bag right-side out.
- Turn Right Side Out: Turn both the outer and lining layers right side out. Gently push out the corners.
Phase 3: Assembling the Wet Bag
- Insert Lining: Place the outer bag inside the lining bag, right sides together. Match up the top edges.
- Pin & Sew: Pin around the top edge. Sew around the top edge with a ½” seam allowance, leaving the 4” opening in the lining.
- Turn and Close Opening: Turn the bag right side out through the opening in the lining. Carefully tuck in the seam allowance of the lining opening and pin it closed. Topstitch around the entire top edge of the bag, closing the lining opening as you sew.
Phase 4: Adding the Closure
- Choose Your Closure: Select your desired closure method (snap, zipper, or Velcro).
- Install Closure:
- Snaps: Follow the manufacturer’s instructions for installing the snaps. Ensure they are securely attached.
- Zipper: Insert the zipper between the outer and lining fabric before sewing the top edge.
- Velcro: Sew the Velcro strips onto the flap of the bag.
Pro Tips
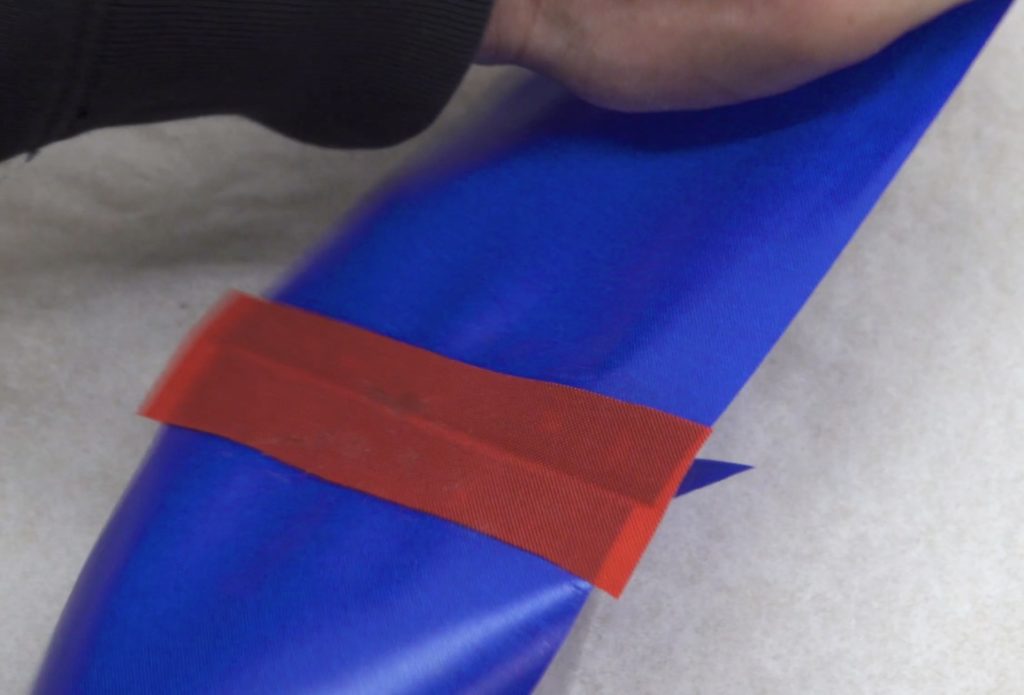
- Reinforce Seams: For extra durability, especially with PUL, consider zigzag stitching or a serger finish along the seams.
- Waterproof Thread: Using polyester or nylon thread improves water resistance compared to cotton thread.
- PUL Care: Avoid using fabric softener when washing PUL, as it can reduce its waterproof properties.
- Zipper Choice: Use a waterproof zipper for maximum leak protection.
- Double Stitch: Double stitch the bottom corners for added strength.
- Pre-Wash Fabrics: Pre-wash all fabrics before cutting to prevent shrinkage after sewing.
- Walking Foot: Use a walking foot for your sewing machine when working with PUL to prevent it from sticking.
Professional Help
If you’re struggling with the sewing process or encounter issues with waterproofing, consider consulting a local seamstress or tailor. They can provide expert advice and repair any mistakes. The cost for professional assistance will vary depending on the extent of the work, but typically ranges from $20-$50.
FAQ
Q: Can I use any fabric for the lining?
A: While you can use various fabrics, fleece, flannel, and PUL are recommended for their absorbency and/or waterproof properties.
Q: What is the best closure for a cloth diaper wet bag?
A: Snaps are a popular choice for cloth diaper wet bags as they are secure and easy to use. Zippers offer the best leak protection but can be more challenging to install.
Q: How do I clean a wet bag?
A: Wet bags are machine washable. Wash on a cold cycle and hang to dry. Avoid using fabric softener.
Q: What if my wet bag leaks?
A: Check the seams for any gaps or holes. If using PUL, ensure it hasn’t been damaged by high heat. Consider adding a waterproof zipper or reinforcing the seams.
Alternative Solutions
If sewing isn’t your forte, you can purchase pre-made wet bags online or at baby stores. However, these can be more expensive and may not offer the same level of customization. A reusable plastic bag is another option, but it won’t be as absorbent or discreet as a wet bag.
| Solution | Pros | Cons | Best For |
|---|---|---|---|
| Pre-Made Wet Bag | Convenient, Variety of Designs | More Expensive, Limited Customization | All Uses |
| Reusable Plastic Bag | Affordable, Easy to Find | Not Absorbent, Less Discreet | Light Use |
Keep Your Belongings Dry
Congratulations on learning how to sew a wet bag! By following these steps, you’ve created a practical and reusable solution for containing wet or soiled items. Remember to choose fabrics suited to your intended use and take your time with the sewing process.
What will you use your new wet bag for? Share your project in the comments below!


